Showing posts with label DIY. Show all posts

Thursday, November 19, 2015

Kitchen Reveal: A love story three years in the making


The moment has finally arrived. Our kitchen project, almost three years in the making is finally, finally complete! Are there still a few finishing touches? Sure. I'm not sure we'll ever really be finished with any project in our house because we like to change things up. Before we had kids, the hubby and I would rearrange our apartment every six months just for fun. We still want to update a few light fixtures, and there might be a few pieces of blue tape marking spots that need a paint touch up, but the major work is done. 

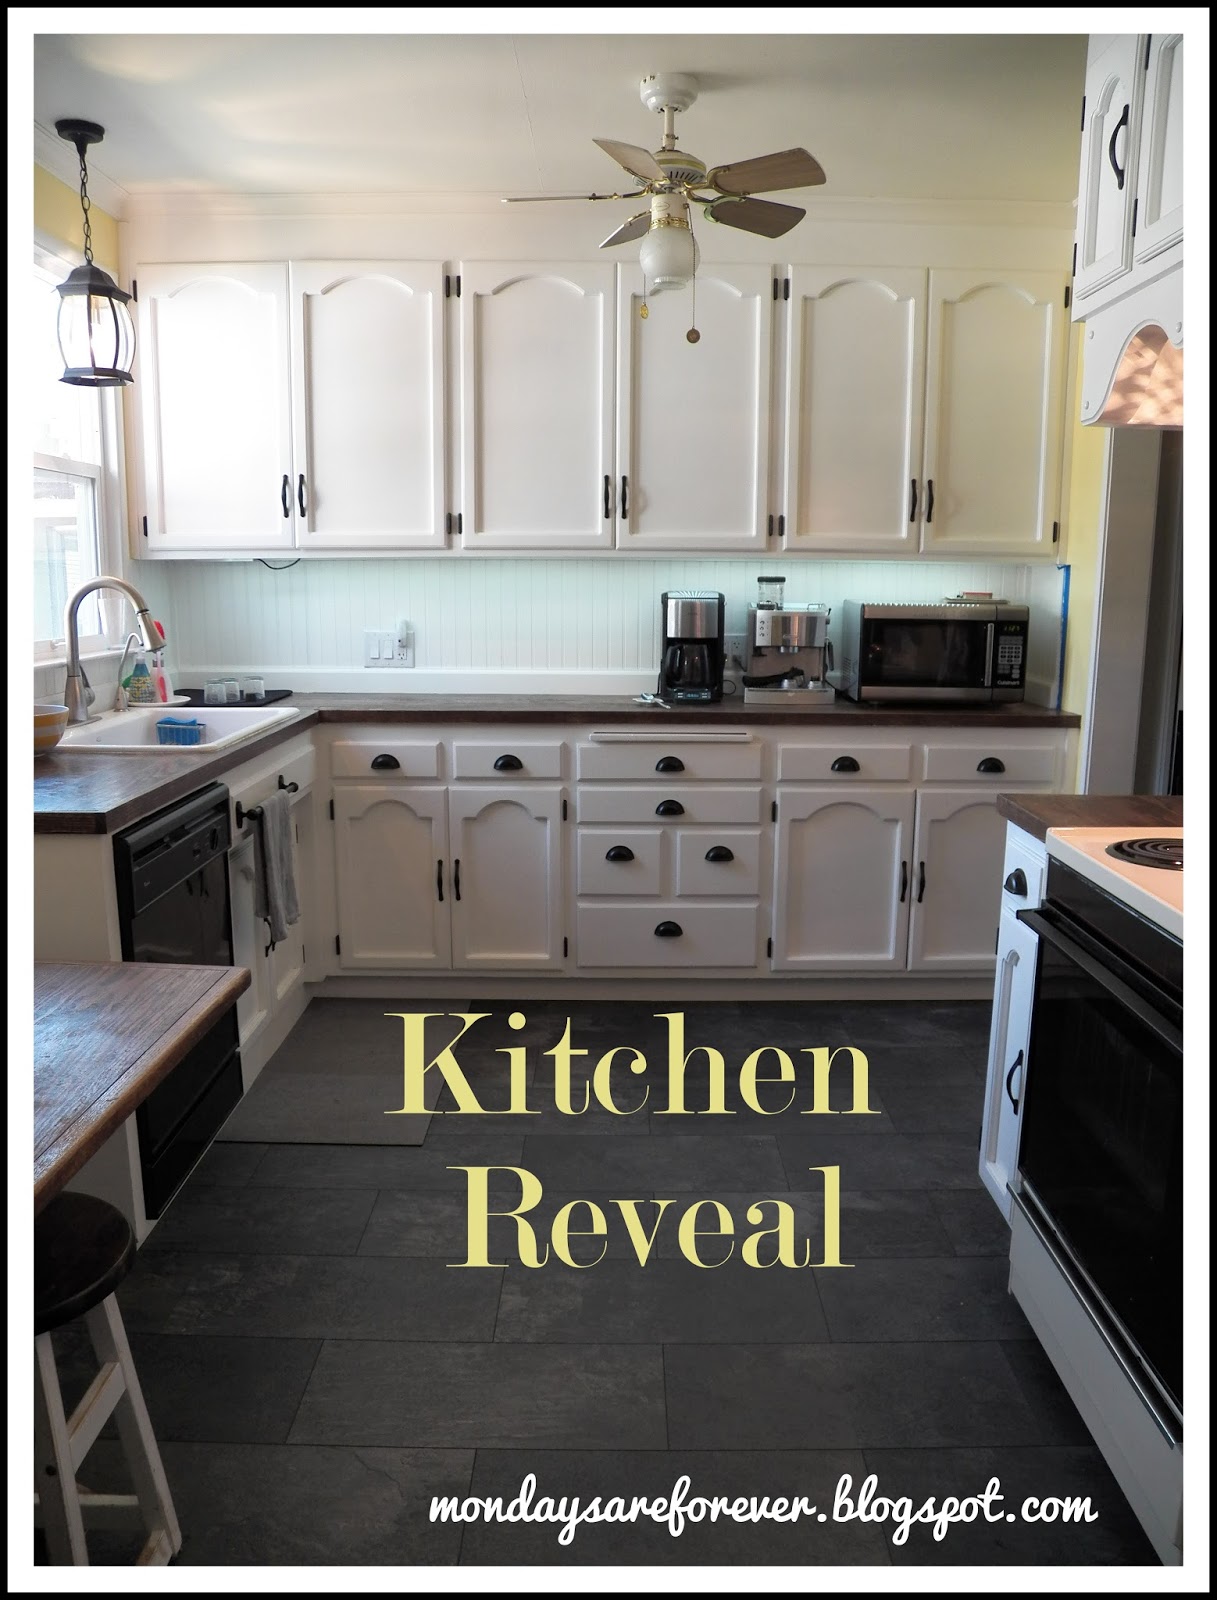
And if you saw the before pictures of our kitchen, you know that a few pieces of blue tape are negligible compared to the monstrosity we began with. So without further ado, I present our kitchen.


We started by painting the cabinets white. Simply White, actually which happens to be the Benjamin Moore 2016 Color of the Year. Of course, we didn't know that three years ago, but I feel like it's a bit serendipitous. 


My husband built those fabulous countertops out of red oak planks and stained them with a combination of dark walnut and mahogany. I absolutely love how they turned out. I love the contrast of the white beadboard backsplash and dark counters. It's warm and bright all at the same time.


These LED under cabinet lights really brighten the main kitchen workspace. I also like to leave them on in the evenings if we are away since they are so energy friendly. 


This cutting board was unusable when we bought the house, but Mr. Sir sanded it down and brought it back to life. He even painted it to match the cabinets (though he wanted to stain it to match the countertops. The man loves me.)


I have wanted a nook for this space since we bought the house. Since the kitchen has been under contruction for most of the time we've owned it, I haven't seriously looked at purchasing one. But a few months ago, Mr. Sir stumbled upon this beauty at 5am while out walking the dog. It had a free sign on it and he could tell it would be snatched up as soon as day broke, so he rushed home and attempted to wake me. The minute I saw the picture I knew it was worth getting up for, even though the baby had kept us up for half of the night, so I threw on some flip-flops and headed down the street  in my pajamas leaving all the kids (finally) asleep in their beds. We carried the table home then took the minivan back for the benches. It's certainly not in perfect condition, but you can cram eight kids at that table and it's a place where memories are made and dreams of bacon come true. 


The nook is where dreams of coffee come true too.
The mini gallery that hangs in the nook couldn't have come out better. The two photos were taken in Napa's wine country and the other two were free prints. You can find the lemon watercolor printable here and Rise and Shine It's Coffee Time here.


This pendant light that hangs over our sink was an outdoor light that hung in front of our house. My husband only thought I was half crazy when I asked him to install it here, but I think we were both happy in the end. You can use boiled linseed oil (available at your local hardware store) to spruce up old fixtures like this one.


I already posted a sneak peek of these DIY Pendant Lights but here's the full view with the cabinets and our art-plastered refrigerator on the side. It was waaaaaaay too much effort to pull all those magnets off and I'm all about being honest anyway. For the record, when I was taking these pictures my oldest said, "It looks really different in here!" I clarified and by "different" he meant "clean." This is further proof that our house has more of a lived in look most of the time. 


The final touch on the kitchen is this slate flooring. Can you tell it's laminate? It looks so gorgeous, but won't crack when our 60 year old house settles. I just hope it holds up to the wear and tear of three kids and a dog. 


And that my friends, is the story of the kitchen I love. What do you think? Was it worth the wait? Tell me in the comments!

Thursday, November 5, 2015

The Season of Gratitude

Fall is by far my favorite season. I love the crisp air, the changing leaves, sweaters, scarves, boots and mugs of hot apple cider. I love that a hot cup of coffee tastes better on cold mornings. I love staying in bed and snuggling too long because it's the perfect temperature under the covers.

My love for fall is one of the many reasons it irks me to walk into Target on November 1st and see that Christmas just threw up in there. I'm no Grinch; I love Christmas...in December. It does not need to encroach, because honestly, one month of cookies and candy canes and Fa la la la la la is about all I can take. I do understand that a holiday that is about being thankful for what you already have kind of kills the spirit of consumerism and so I let my beloved Target off the hook for allowing Christmas to take over November. However, that doesn't mean Thanksgiving has to be overlooked in m my home. Last time I checked, I'm the boss around here.

Since I want to teach my children they have so much to be grateful for, around this time last year we put together a small jar of things we are thankful for. I've seen these all over Pinterest but if you haven't I thought I'd share my version (complete with free printables!)

But first, I thought I'd share a few things I'm grateful for today.

Busy season and late nights at my husband's job. First, he has a job and it's a great one! Second, it's really only busy like this for two months of the year. I know a lot of husbands who work late ALL year long and I'm so grateful that my husband does not have to.
Being a stay-at-home-mom. It's a tough job and I complain about it more than I should. However, I'm always thankful for it when cold season hits. Knox is feverish this week and I'm so glad I'm not trying to find childcare for a sick kid because I have to go to work.
My crazy fixer upper house. It's crazy, but it's also, warm, cozy and filled with a beautiful life we have been building in it.
Two bathrooms since one is out of commission right now...
Healthy, happy kids who behave themselves at school and playdates even if they are less than angelic at home. They save the best and worst for me.
Great teachers and schools. I feel so fortunate to have landed amazing, dedicated passionate teachers at both my son's schools.

What are you grateful for this November? Take a minute to jot it down and put it in your jar!


Click on the links to get the Give Thanks Jar printable and the I'm thankful for tickets!

Thursday, October 1, 2015

Kitchen Sneak Preview: DIY Pendant Lights


My kitchen floor is getting installed this weekend. Maybe that seems like no big deal to you, but I have been living with no flooring in front of my kitchen sink for over two years thanks to an impromptu kitchen remodel. Let's just say I am very excited!

So while we are all waiting for the big kitchen reveal, I thought I'd share one of the smaller projects we've done. We struggled for almost a year trying to figure out what kind of fixture to put over our stove and finally ended up with this fun pendant light.


I started with this mini pendant light from Lowe's because it fit perfectly in the space. The fixture doesn't come with shades so I looked a ton of different options. I wanted something that was low profile so it didn't interfere with my cooking and yet really lit up my work space. Of course, price was a factor as well. Some of the shades I looked at were $20 each! Multiple times three shades, plus the fixture we were looking at over $100!

Eventually I stumbled upon these candle holders at Michael's. They were $5.99 each and on sale for 25% off.  Mr. Sir used a jigsaw to cut a hole in the bottom of each candle holder and viola!


They are exactly what I wanted and for a price that made even the penny pinching Mr. Sir smile. The space is so bright it feels like a completely different kitchen. Mr. Sir built me the spice rack and I added the "Don't Go Bacon My Heart" sign from Etsy because you can't go wrong with bacon puns, right?


Once the flooring goes in, we'll still have a few items to check off our list, like putting the pantry doors back in and picking out new appliances. Notice my funky stove straight out of 1970? It works so I can't complain, but I have my heart set on an awesome free standing double oven. To see the oven and the inspiration for my kitchen remodel, check out my Kitchen Design board on Pinterest.

Monday, September 14, 2015

Kitchen Catastrophe

Last week, I alluded to our accidental kitchen remodel adventure and I know you've been dying to hear the whole story. Let the horror fest begin!

This was the listing photo. It actually looked WORSE in person.
I will never forget walking through this kitchen for the first time; I saw what I thought was hideous 1970's linoleum and was horrified when I found myself squishing through mildew-y CARPET. Who in their right mind puts carpet in the kitchen?
The cabinets were in bad shape and the cabinet hardware was sticky from years of kitchen grease. 

The thought of that nasty carpet still makes me shudder. In spite of it, a more optimistic version of myself looked around the room and thought, "It's ugly, but with some paint and new floors, it has so much potential." It had a great layout, plenty of cabinets and counter top space, and even a spacious pantry. I knew we'd have to live with the buttered popcorn tile for a while before we could afford to replace it, but it was certainly the lesser of the evils.

Oh that tile. It was cream with yellow flecks just like a buttered popcorn Jelly Belly Bean.
As soon as they handed us the keys, we donned our gas masks and giddily ripped out that carpet. We bought the cheapest peel and stick tile we could find on Amazon, slapped some paint on the walls and moved on to the next project. We also put a new kitchen faucet in and fixed a small leak under the kitchen sink. We noted that there was some minor water damage from the leak, but we had bigger fish to fry. There were so many urgent problems (like toilets that wouldn't flush, showers that didn't drain and a room that wasn't ready for new baby that was on the way) we were pretty much putting out fires.

Wallpaper removed and fresh yellow paint to match the tile. 

About a year later, once we had adjusted to the addition of Knox to our family, Mr. Sir decided he was ready to repair the damage under the kitchen sink. It was a seemingly simple job; cut out the damaged wood and replace it with new wood. Except the damage wasn't just under the sink, it seemed to be in the wall and the floor. As he looked closer, the damage went deeper until it became clear that the studs in the wall were rotted and the entire sink and counter would need to be removed to repair it. Ripping out the counter meant damaging the precious buttered popcorn tile and thus began the impromptu kitchen remodel!

Want to see the finished product? Me too. We started this madness in January of 2013 and we are finally getting close to completing it. Stay tuned for a sneak peek next week!

Thursday, September 10, 2015

Labors of Love

My fancy red garage door.
Helllloooooo! Everyone back in the swing of things after the long weekend? Yeah, me neither. It was nice to have an extra day off, but long weekends always make me feel like I have to cram five days worth of work into four days. It just makes the week a little more hectic than usual and it's always a little bit hectic around here. But that is another story.

I spent my Labor Day painting my garage door in 100 degree weather and believe it or not, it was awesome. For almost six hours, I had uninterrupted, coherent thoughts. While Mr. Sir wrangled the children all day I worked on a project and completed it. (Ok, almost completed it. I primed it and painted it, but it still needs a second coat.) Regardless, it was so satisfying to accomplish something from start to finish and then stand back and enjoy the fruits of my labor. In motherhood, my job is never done. There's always another dish in the sink, a dirty sock that escaped the washer, another meal to make. Acceptance is the name of the game, and almost clean has to be good enough for this phase of life, because I would go absolutely insane trying to do it all. In fact, after five years of motherhood, I think that I may have forgotten what completing something feels like because finishing this project felt so good. It's almost addicting. And now I've got the project completion bug and let me tell you, there is absolutely no shortage of ongoing projects in this house. 

You see, we have this ridiculous fixer upper house. We knew when we bought it that it needed a lot of love, but we had no idea it was going to be the house from the Money Pit. We also didn't know that (surprise!) we were expecting our son Knox, until the week we closed on the house. All our plans of staying up late after Dash went to bed to power through projects went right out the window.

Over the last four years we have ever so slowly done a project here and another there, trying to balance our growing family with our insane desire to have nice things. The progress has been painstakingly slow, trying to save money by doing all the work ourselves, but right now, maybe even by the end of the month we are about to hit TWO major milestones.

The first, is painting the entire exterior of our house which will be complete when I slap the last coat of paint on our garage door. (For the record, all credit goes to Mr. Sir on that one. He painted every surface of our home except the garage door on weekends and evenings for the better part of the last year. I was busy incubating a different labor of love named Buttercup.) Second, we are getting very close to completing our impromptu kitchen remodel. I'll save the story of the accidental kitchen remodel for another post, but I will tell you that it has been under construction for the better part of two years and that there was CARPET in the kitchen when we bought it four years ago.

Oh, how far we've come! In the meantime, what do you think of my garage door labor of love?


Thursday, August 6, 2015

A Sanctuary Bought for a Song

When my husband and I first moved in together we had absolutely no furniture. Not even a bed. After we moved into our apartment, we took our U-Haul over to Ikea and picked up the cheapest bed and couch we possibly could. That night, we came home and assembled Ikea furniture until midnight just so we’d have a place to rest our weary bones after moving all day. Almost eight years, another apartment, two babies and a fixer upper house later, we were still sleeping on our full size Ikea bed. That’s right people. I said FULL SIZE bed. We’ve wanted to upgrade for a while, but that costs money and I can think of a hundred things I’d like to drop a wad of cash on other than a bed. (Do you know how many bottles of wine you can get for that kind of money? I digress…)

As fate would have it, my parents decided to upgrade their bed and offered to give us (and deliver!) their old Tempur-Pedic California King. How could I refuse an offer to have my bed and drink my wine too? In anticipation of our exciting new bed (and by new, I mean 10 year old hand-me-down, but those Tempur-Pedics are good for a lifetime, right?) I started shopping for bedding. Though I might not want to spend a truckload of money on actual bed, I love buying linens. I love a reason to browse the Pottery Barn website even if I’ll never buy anything because their prices make me cry. I could wander through Target looking at home goods for hours because it’s my happy place. I browsed to my little heart’s content until found a duvet from Overstock that made me swoon.
Source
I wanted something that was bright and colorful. (Read, hides stains well.)
I wanted something that incorporated the crazy green dresser we bought off craigslist and painted when we still had time for labors of love that weren’t our children.
And I wanted some new colors, because as much as I love that green dresser, I’m ready for something new and I needed a palette that would match the old me AND inspire the new me.
Green bedroom dresser @alisamalisa @meredithspidel
This set was everything I wanted until I saw the price. $99.00 for a duvet, shams (that will never get used because we hate taking them on and off) and three throw pillows. Don’t get me wrong, I like pretty pillows, but I’m a practical girl. I don’t even make my bed half of the time because I’m just going to get right back in it. Preferably sooner rather than later. The bottom line was that I wasn’t willing to cough up almost $100 for just a duvet, even if it made me swoon.
So I shopped on. I shopped all of my favorite places online and in store, dragging my boys through every linen shop in town. Even my beloved Target didn’t have anything that satisfied both the dreamer and the penny pincher. Becoming desperate, I started looking into sewing my own duvet, but when all was said and done it was still going to cost me around $60. At one point, I seriously considered turning a shower curtain into a duvet because I thought it might be more cost efficient!
And then I stumbled on this at Wal-Mart.
Walmart Duvet Cover Set @alisamalisa @meredithspidel
Yep. That is EXACTLY the same duvet set I found on Overstock for almost $40 less. It’s a good thing I took a screenshot of this price, because Wal-Mart has recently increased the price to $109! Since I could barely make a duvet for that price, I ordered it. And then I promptly spent all my savings on some king size pillows.
Duvet Set @alisamalisa @meredithspidel
10006202_295932380560420_1918986372_n
Did you notice the absurd number of pillows on my bed after I mentioned how unnecessary decorative pillows are? I may have purchased NINE pillows this week. And by may I mean I totally did. Don’t judge. In the end I was pretty satisfied with the overall cost of my makeover, including the pillow binge. Here’s the breakdown:
Duvet Set: $66 (One duvet, two king shams and three throw pillows)
Pillows: $52 (Four king size and two standard)
Sheets: $57 (I picked up two sets of 300 thread count sheets, one from Anna’s Linens ($32) and another from Bed, Bath and Beyond ($25)on super clearance with a 20% off coupon. )
Total cost for my bedding makeover: $175
Could I have gotten a better deal? Probably. Could I be happier? Nope. I read once that your master bedroom should be a sanctuary, an oasis if you will. A place where you can escape your children and pretend like you still have an adult life. Though I wouldn’t go so far as to say that it feels like an oasis in here, I can say that it feels as if grown-ups live here and not just a bunch of monkeys who like to jump on the bed.

This post originally appeared at Mom of the Year. For a less serious look at the world of parenting, meet Meredith.

Monday, July 13, 2015

Breakfast in a Mug


$5/4 at Target!
I wanted to pick up a small token of appreciation for the teachers at Dash's preschool, but I was at a loss for what would make a good, inexpensive gift. I wanted to get them something that was both useful and thoughtful and since he had four teachers this year, it had to be the right price too. Then I stumbled upon these beauties at Target. They were four for $5 and I began to formulate the perfect gift...Breakfast in a Mug. Or in this case a travel cup.

I made a batch of fresh blueberry muffins for the kids' breakfast. I didn't need all those carbs tempting me. So I wrapped one up for each teacher.

I wasn't sure if his teachers were tea or coffee people so I decided to add both. I riffled through my tea supply and picked out some chamomile, English Breakfast and vanilla chai. 

Later, I picked up a pack of the Starbucks instant coffees. (Just to clarify I am a Peet's person and I feel very strongly about it, but Starbucks is walking distance from my house. Stop judging me.)

I added some bows and a little note that said, "Thanks!" on top and voila!

Since I had the blueberry muffins and tea on hand, my out of pocket expense was $15, which works out to $3.75 per gift. Not too shabby!


These would make a great gift for any affair. You could make them up for bridesmaids and hand them out on the morning of the wedding. Or for Boss Appreciation Day. (Which is Friday, October 16th this year in case you are wondering.) You could even whip them up to welcome a new neighbor into your neighborhood.

Who would you make them for? Tell me in the comments!


Monday, June 22, 2015

Pottery Barn Art on the Cheap

I'm embarrassed to admit that we've lived in our house for over two years now and there are still rooms with bare walls. I've been attempting to remedy this for quite a while now, but my lack of skills in this department continues to defeat me. Naturally, I can't avoid those bare walls forever, so I recently started browsing the Pottery Barn website looking for art inspiration. I can't afford anything from the Pottery Barn, but a girl can dream, right? But during my online window shopping I came across the mother load. The secret to 90% off Pottery Barn prices is here!


Monday, June 8, 2015

Oatmeal Cranberry Cookies

On Monday, I was in the mood for Baked Spinach Meatball sliders. I knew I was out of parmesan cheese and so I tempted the nap gods and swung by the store on the way home from preschool pick up. When we came home, I tucked the boys in for their nap and patted myself on the back as started to prep dinner. Look at me kicking Monday in the butt! And then I realized that I was out of eggs. I had stopped by the store for ingredients and had everything I needed minus ONE, measly egg. I probably could have omitted it, but I didn't want to tempt the dinner gods after I had already tempted the nap gods. So I grabbed the baby monitor and dashed out into the pouring rain to my neighbor's house to borrow an egg. My sweet neighbor came back with three eggs because she wasn't convinced that I only need one.
I wanted to thank her so I decided to bake a batch of oatmeal cookies. I'm a fan of the Quaker Oat Vanishing Oatmeal Raisin Cookie recipe, except for the raisin part. As far as I'm concerned, raisins have no business in cookies. Last time I used chocolate chips, but thought that they were actually too sweet. Who knew that was even possible?! I settled on dried cranberries and stumbled on a goldmine. These cookies are dangerously delicious. It's a good thing we shared them with our neighbors because we devoured the rest of batch by dinnertime.  
Are you loving the DIY origami cookie boxes? I found them on Pinterest ages ago and I finally had an opportunity to make some. (Read: I made a giant mess in my kitchen followed by a giant craft mess. Never go full Pinterest.) The result was ridiculously cute (and messy.) I followed the tutorial exactly, but instead of tying it off with ribbon I stapled it closed. I couldn't find the single hole punch anywhere and so I had to make do.
And without further ado..

Oatmeal Cranberry Cookies

Ingredients
1/2 cup (1 stick) plus 6tbsp. butter, softened (That's almost two whole sticks of butter. No wonder they are delicious!)
3/4 cup firmly packed brown sugar
1/2 cup granulated sugar
2 eggs
1 teaspoon vanilla
1 1/2 cups all-purpose flour
1 teaspoon baking soda
1 teaspoon cinnamon
1/2 teaspoon salt
3 cups Quaker Oats (quick or old fashioned, uncooked)
1 cup dried cranberries
Directions 
1. Heat oven to 350°F. In large bowl, beat butter and sugars on medium speed of electric mixer until creamy.
2. Add eggs and vanilla; beat well.
3. Add combined flour, baking soda, cinnamon and salt; mix well.
4. Add oats and raisins; mix well. Drop dough by rounded tablespoonfuls onto ungreased cookie sheets.
5. Bake 8 to 10 minutes or until light golden brown. Cool 1 minute on cookie sheets; remove to wire rack. Cool completely. Store tightly covered.         
                                         
This recipe received one star from my family.
*Plate-Licking Good

For more about my rating system, head over to the Eats page.

Monday, June 1, 2015

The Reluctant Gardener

I use the term gardener very loosely. In fact, when I use the word gardener to refer to myself, I actually mean black thumb or person who kills every plant she touches within a 10-mile radius. I’m like the plague for plants.  I had pretty much given up on growing anything but babies until we bought a house. On a corner lot (read: huge front yard) with empty planters.

Daffodils, planted by (my) Mother Nature
Our neighbors across the street have an absolutely beautiful yard. It has lovely flowers in the spring. It has a variety of evergreen shrubs that look fantastic in the winter. On one side, there’s a lemon tree bursting with lemons all year long. It is absolutely gorgeous. My yard on the other hand, well, we've got dandelions and though they have flowers, technically those are weeds.

It is not that I feel the need to keep up with the Jones’. Our neighbor is lovely retired gentleman who prides himself on his yard. He spends hours a day weeding, pruning and planting. Ain’t nobody got time for that with two boys and a dog. But I feel bad that when I look out my bay window, I have a lovely view of their garden while they have a stellar view of my weeds. That, and when you buy a fixer-upper house, the idea is to actually fix it up.

We can grow grass. 
At first, I bought some simple wildflower seeds. I was 8 months pregnant so I conned my friends into coming over to pull all the weeds for me and put the seeds down. In the end they were certainly wild, but not very flowery. They were hideous 4 ft stick-weed-bushes. Fortunately, I’m an expert at killing plants so I had no problem abating those. We had a hot summer and with a new baby in the house, the hubby and I decided we were too cheap to water anything. Good-bye weedflowers. Unfortunately, we killed off part of our lawn too. So the next summer we reseeded and spent the kids’ college fund watering the lawn. (Side note: I learned you are supposed to reseed in the winter and let Mother Nature do the watering. Ooops. I suppose the kids will build some character in community college. No? I’m sure there’s an upside somewhere…)

The ever-hardy rosemary
Really, the upside is that our new grass actually grew. In fact, it flourished. I thought for a moment that perhaps I could grow myself a green thumb. In the fall, my mother (who rivals Mother Nature with her magical green thumb) planted some flowers, broccoli, basil and rosemary. Alas, my black thumb title remained untarnished; it wasn't long before most of the plants were lost. All of the broccolis were systematically taken out by bugs. The basil went down next. The rosemary was the only survivor. Out of the flowers, only three perished and miraculously a whole slew of daffodil bulbs recently started to appear.

If nothing else I'm determined, so I recently planted my favorite spring flower – tulips. I accidentally planted them in winter instead of in the fall so they would be as stunted as the rest of the plants in the yard, but they have proven to be pretty hardy. So far five out of ten have popped up. Given my track record, I’m calling that a success.

No actual tulips yet...
I may not have a green thumb, but I intend to conquer yard this with sheer will power. How about you? Are you the plague to plants or does beauty and life spring from everything you touch? For more trial and error gardening, follow me on Pinterest and check out my Gardening for Dummies board.